Introduction to Dryer Vent Maintenance
Dryer vent cleaning is an essential home maintenance task that helps prevent house fires, improves dryer performance, and extends appliance life. Homeowners should understand how dryer vents work, the warning signs of blockage, and when professional cleaning is necessary.
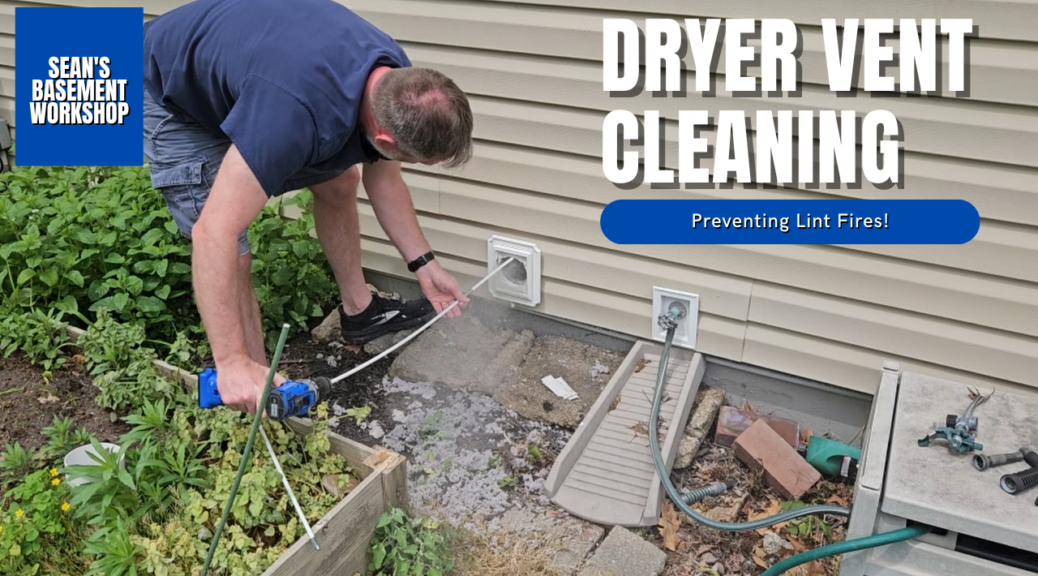
A clogged vent doesn’t just make laundry day frustrating — it wastes energy, strains your dryer, and increases the risk of a dangerous lint fire. The cleaning process shown in the uploaded video demonstrates just how much lint can hide inside those ducts, even if you clean your lint trap regularly. Once you see the pile of debris that comes out of a neglected vent, it becomes clear why routine cleaning matters.
Why Dryer Vent Cleaning Is Important for Homeowners
Lint builds up faster than people think. Every load of laundry releases tiny fibers into the airflow inside the dryer. While the lint trap catches most of it, a surprising amount escapes into the vent line. Over time, this lint sticks to the walls of the duct, especially in areas with bends or dips. Eventually, the airflow becomes restricted, which makes the dryer work harder to push the moist air outside.
When airflow drops, everything becomes less efficient. Your dryer needs more time, uses more energy, and its internal components wear down faster. Worst of all, lint is incredibly flammable. With the high heat that dryers generate, a clogged vent becomes a genuine fire hazard. That alone is reason enough to take dryer vent cleaning seriously.
A dryer vent fire happened to a lady I knew, but luckily, it was caught quickly and only caused minor damage to her basement laundry room area. Still, this was a great mess and disruption to her life.
Warning Signs Your Dryer Vent Needs Cleaning
Clothes Taking Longer to Dry
If your clothes are still damp after a cycle — especially heavy items like towels or bedding — your dryer isn’t the issue. The vent is. When lint restricts airflow, warm, moist air can’t escape. The machine ends up reheating the same moist air, dragging out drying times. After all, the drying process entails heating up the air in which moisture can travel and escape. Restrict the flow, and it can’t escape.
Overheating or a Burning Smell
A dryer should never smell like something is overheating. That warm, slightly burnt odor is lint scorching inside the vent. This is one warning sign you don’t want to brush off.
Lint Collecting Behind or Beneath the Dryer
Lint on the floor or behind the unit almost always means a leak in the vent hose or a blockage pushing lint back into the room.
A Hot or Humid Laundry Room
If the dryer is running but the vent can’t push air outside effectively, all that heat gets dumped into the laundry space. It might feel like a sauna after one load.
Safety Risks of a Dirty Dryer Vent
Fire Hazards
Thousands of house fires each year are traced back to clogged dryer vents. Lint ignites easily, and once flames start inside a vent line, they can spread rapidly through walls or crawlspaces.
Carbon Monoxide Concerns (Gas Dryers)
Gas dryers produce exhaust gases similar to a furnace. A blocked vent can push those gases — including carbon monoxide — back into the home. Proper venting is essential for safe operation.
Mold and Moisture Problems
If warm, humid air can’t escape the vent, it condenses inside the duct or the surrounding wall. Moisture plus lint equals a perfect environment for mold growth.
Tools Needed for Dryer Vent Cleaning
Cleaning a dryer vent doesn’t require a garage full of tools. You probably have several of the essentials already.
Basic Tools
- A screwdriver (usually Phillips)
- Shop vacuum or standard vacuum with hose attachment
- Corded or Cordless Drill
- Flashlight
Helpful Dryer Vent Cleaning Supplies
- Flexible cleaning rod kit
- Drill-powered dryer vent brush (a major upgrade)
- Lint trap cleaning brush
Optional Protective Gear
- Dust mask
- Gloves
- Eye protection
Lint doesn’t seem dangerous, but it gets everywhere once disturbed. Safety gear keeps the job cleaner and more comfortable.
Step-by-Step Dryer Vent Cleaning I Performed
The video breaks down the cleaning process clearly and efficiently, showing the real-world buildup inside both short and long vent runs. Here’s the complete process.
Step 1 – Disconnect the Dryer
First, unplug the dryer. If you’re working with a gas dryer, turn off the gas valve to prevent accidental leaks while you move it. Pull the dryer out just far enough to access the vent connection. You’ll usually see either a clamp or a metal band securing the vent hose.
Step 2 – Inspect the Vent for Blockages
Remove the hose and shine a flashlight into the opening. Many people are shocked at the amount of lint packed into this first foot of vent pipe. Taking a moment to look helps you understand how neglected the vent may be.
Step 3 – Clean the Lint Trap Housing
Even if you clean the lint filter every load, material still builds up inside the housing beneath the filter. Using a long, flexible vacuum attachment removes that hidden debris. In the video, you can see how much lint the vacuum pulls from a spot most homeowners overlook.
I have another complete article on how I went about doing this if you want to read it after this one – SBW#43 – Washer/Dryer Combo Lint Cleaning
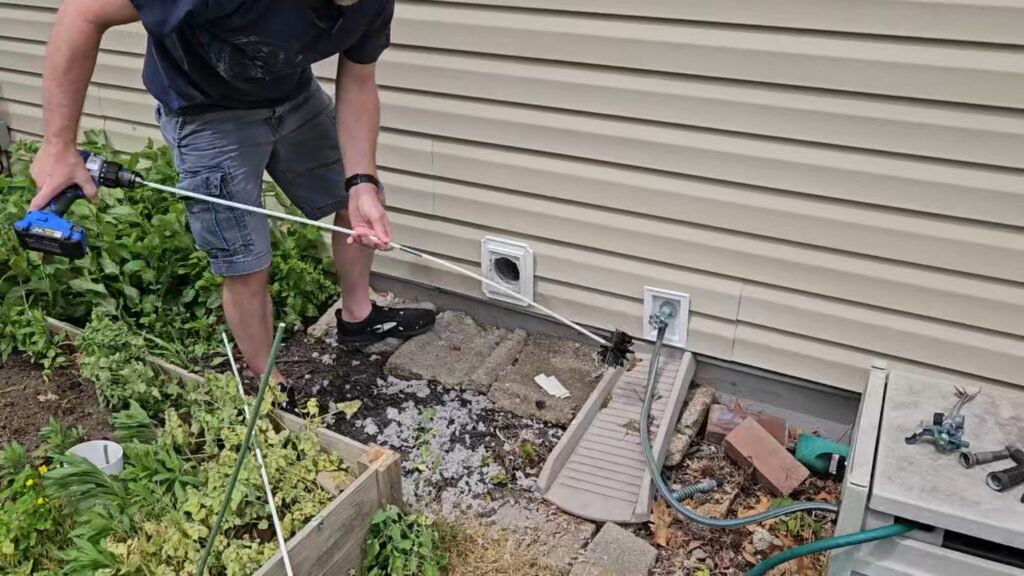
Step 4 – Brush Out the Vent Line
Feed your brush rods into the vent pipe and start pushing them through. Each section of flexible rod screws into the next, making it easy to reach long runs. As you rotate and push, the brush knocks loose lint that falls back toward the dryer side or out the exit.
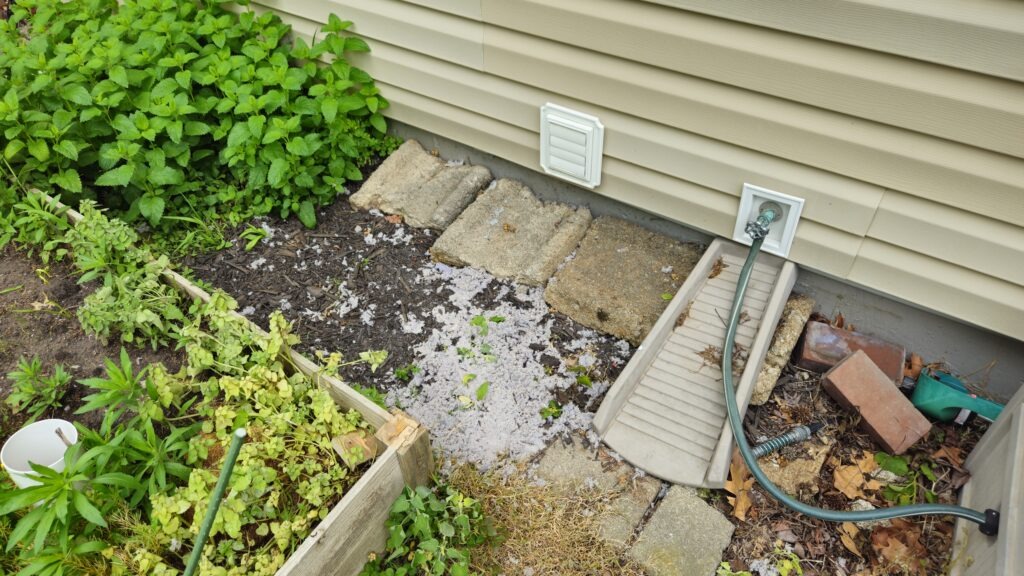
Step 5 – Clean the Exterior Vent Hood
Outside the home, open the vent hood and remove the lint trapped around the flap or screen. This area often collects large clumps because it’s where warm air meets outside temperatures. If your exterior vent has a screen, consider removing it — screens trap lint and restrict airflow.
Step 6 – Use a Drill-Powered Cleaning Brush
The drill-powered brush is a game-changer. Once attached, the spinning motion scrubs the entire inside surface of the vent pipe. This lifts compacted lint and pulls out buildup that standard brushing can’t always reach. In the video, you can actually see how much more lint the drill removes compared to manual brushing. I did this from outside of the house with the dryer connected backup, running in Air Fluff mode so it would push air through the line. You can also do this with a shop vac exhaust line connected up to the line to force air out instead of using the dryer.
Step 7 – Reconnect and Test the Dryer
Reconnect the vent hose securely and push the dryer back into place without crushing the vent. Plug it back in and run a short cycle while checking the airflow outside. A strong stream of warm air means your system is clean and operating efficiently.
Tips for Keeping Dryer Vents Cleaner Longer
Clean the Vent at Least Once a Year
Most homes only need annual cleaning. Larger households, or those with pets or heavy laundry usage, may need cleaning every six months.
Use the Right Type of Vent Hose
Rigid or semi-rigid metal ducts outperform foil flex hoses. They resist crushing, improve airflow, and significantly reduce fire risks as the ribbing causes air to slow down.
Keep the Lint Trap Clean
Cleaning the lint filter before every load helps prevent lint from traveling into the vent system.
Avoid Overloading the Dryer
Too much laundry restricts internal airflow, meaning more lint escapes past the trap.
Vacuum Around the Dryer Periodically
Keeping dust and lint off the floor reduces fire risk and helps you spot leaks early.
DIY Dryer Vent Cleaning vs. Hiring a Professional
When DIY Works
Straight vent runs that exit directly outside are easy for homeowners to clean. A few tools and an hour of time are usually enough.
When to Call a Pro
- Vents that run through the attic or roof
- Systems with multiple elbows or long horizontal runs
- Signs of moisture damage around vent openings
- Repeated clogs even after cleaning
Cost of Professional Cleaning
Most professional services charge between $100 and $250, depending on vent complexity and length.
Enhancing Your Laundry Room Setup
If you want to enhance your laundry room setup, here are some helpful upgrades you might consider:
Improve Your Vent Pathway
Switching to rigid metal ducting improves efficiency and safety instantly. You can also build a recessed dryer vent box that allows the dryer to sit closer to the wall without crushing the hose.
Add DIY Storage or Workspace
A countertop over the washer and dryer makes folding laundry easier. You can build it from plywood, butcher block, or hardwood, depending on your style.
Build a Dryer Pedestal
Raising the dryer (and washer) creates storage space underneath while making laundry easier on your back.
Final Thoughts
Dryer vent cleaning might feel like a chore, but the payoff is worth it. A clean vent protects your home from fire hazards, improves dryer performance, and reduces energy use. The cleaning process demonstrated in the video shows how much lint hides inside vents — and how easily it can be removed with the right tools.
Once you’ve cleaned your vent, you’ll probably notice your clothes dry faster, the dryer runs cooler, and your laundry room stays more comfortable. It’s a simple task with significant benefits, and now that you know the steps, you can tackle it confidently.
Frequently Asked Questions About Dryer Vent Cleaning
1. How often should a dryer vent be cleaned?
Most dryer vents should be cleaned at least once per year. Homes with heavy laundry use may need cleaning every 6 months.
2. What are the signs of a clogged dryer vent?
Long drying times, excessive heat, burning smells, and lint buildup around the vent are common warning signs.
3. Can I vacuum the vent instead of brushing it?
A vacuum helps, but it won’t reach deep inside the duct. Brush kits remove far more lint.
4. Is it safe to use foil dryer ducts?
Foil ducts crush easily and trap lint. The ribbing slows down airflow, resulting in more lint buildup. In addition, in some areas, building codes strictly prohibit this type of duct. Rigid metal ducts are much safer and more efficient.
5. What’s the easiest way to tell if a vent is clogged?
Check the airflow at the exterior vent hood. Weak airflow usually signals a blockage.
6. Does cleaning the dryer vent really reduce drying time?
Absolutely. Better airflow means faster drying, lower energy use, and longer dryer lifespan.
If you want to see how I completed this task, check out the build video.
I hope you find this helpful video useful and can use some of the tips presented. Feel free to leave any comments, suggestions, or experiences you have had below.
Some of the links in my video description and article above are Amazon Affiliate links. As an Amazon Associate, I earn from qualifying purchases. If you would like to make a purchase from Amazon, you can also use the storewide link.